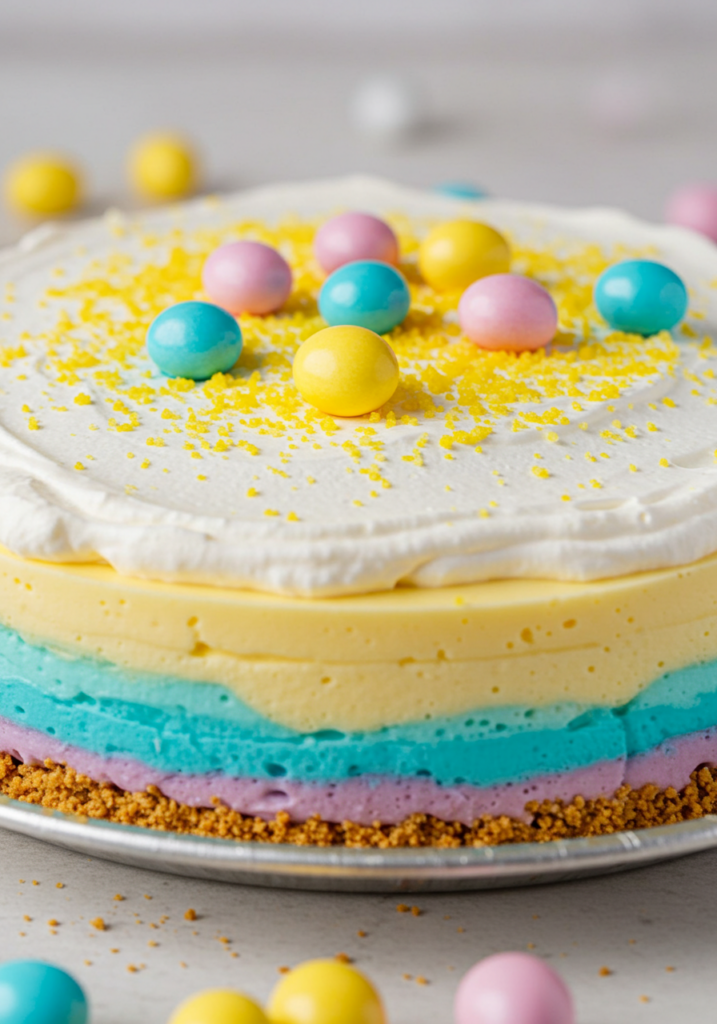
Looking for a colorful and fun dessert that will wow your guests this Easter? This Easter Jell-O Pie is the perfect treat! With its vibrant layers of fruit-flavored Jell-O and creamy filling, this pie is not only delicious but also visually striking. It’s a fun way to celebrate the holiday and a perfect addition to your Easter dessert table. The best part? It’s incredibly easy to make and requires no baking—just a little patience while it sets in the fridge.
Want recipes like this delivered straight to your inbox? Subscribe now to get the latest culinary creations you’ll love.
Why You’ll Love This Recipe
- Colorful & Festive – The bright, layered Jell-O gives this pie a fun, festive look that’s perfect for Easter.
- No-Bake – This pie requires no baking, making it an easy and quick dessert to prepare.
- Creamy & Refreshing – The creamy filling balances out the sweet, tangy Jell-O for a refreshing bite.
- Customizable – You can change the flavors of Jell-O to suit your tastes or even use sugar-free Jell-O for a lighter version.
- Great for Make-Ahead – This pie needs a few hours to set, making it ideal for prepping ahead of time.
Ingredients You’ll Need
For the Pie:
- 1 pre-made graham cracker crust (or make your own)
- 1 (3 oz) box of strawberry Jell-O
- 1 (3 oz) box of lime Jell-O
- 1 (3 oz) box of orange Jell-O
- 1 (3 oz) box of yellow Jell-O
- 1 cup boiling water (for each Jell-O flavor)
- 1 cup cold water (for each Jell-O flavor)
- 1 (8 oz) package cream cheese, softened
- 1 (8 oz) tub of whipped topping (like Cool Whip)
- ½ cup powdered sugar
- 1 tsp vanilla extract
Tools You’ll Need
- Mixing bowls
- Whisk
- Spoon or spatula
- 9-inch pie dish
- Measuring cups and spoons
Step-by-Step Instructions
Step 1: Prepare the Jell-O Layers
- Begin by preparing the Jell-O. In separate bowls, dissolve each box of Jell-O in 1 cup of boiling water. Stir until completely dissolved.
- Once dissolved, add 1 cup of cold water to each bowl and mix well.
- Let the Jell-O sit at room temperature for about 10 minutes to slightly cool.
Step 2: Layer the Jell-O
- Pour the first flavor of Jell-O (e.g., strawberry) into the bottom of the graham cracker crust. Use a spoon to spread it evenly.
- Place the pie in the fridge for about 30 minutes to set, or until the first layer is firm to the touch.
- Once the first layer has set, carefully pour the next Jell-O flavor (e.g., lime) over the first layer. Be gentle to avoid disturbing the layer below.
- Refrigerate the pie for another 30 minutes to set this layer.
- Repeat this process with the remaining Jell-O flavors (orange and yellow), allowing each layer to set in the fridge before adding the next.
Step 3: Prepare the Cream Cheese Filling
- While the Jell-O layers are setting, make the creamy filling. In a mixing bowl, beat the softened cream cheese with an electric mixer until smooth.
- Add the powdered sugar and vanilla extract, and continue mixing until fully combined.
- Gently fold in the whipped topping until the mixture is smooth and fluffy.
Step 4: Assemble the Pie
- Once the final layer of Jell-O has set, spread the cream cheese filling over the top of the pie, smoothing it out to cover the entire surface.
- Return the pie to the fridge and chill for at least 3 hours or until completely set.
Step 5: Serve
- Before serving, garnish the pie with extra whipped topping or colorful sprinkles for an extra festive touch.
- Slice the pie and enjoy the refreshing, fruity layers combined with the creamy filling!
Tips for Perfect Easter Jell-O Pie
- Let Each Layer Set Properly – Be patient and allow each layer to set before adding the next one. This ensures clean, defined layers when you slice the pie.
- Use Room Temperature Cream Cheese – To avoid lumps in the filling, make sure the cream cheese is softened to room temperature before mixing.
- Experiment with Jell-O Flavors – You can change up the Jell-O flavors based on what you like or the colors you want for your pie. Blue, raspberry, and grape are great options for a different twist.
- Use a No-Bake Crust – If you’re short on time, you can buy a pre-made no-bake graham cracker crust, but if you want to go the extra mile, homemade graham cracker crust adds extra flavor and crunch.
Serving Suggestions
- Top with Fresh Fruit – Garnish your pie with fresh berries, like strawberries or blueberries, for added color and flavor.
- Serve with Whipped Cream – Top each slice with a dollop of whipped cream for extra creaminess.
- Add Easter-Themed Decorations – Use Easter sprinkles or mini chocolate eggs to make the pie even more festive.
How to Store & Reheat
Storing:
- Store the pie in an airtight container or cover it with plastic wrap to keep it fresh in the fridge for up to 3 days.
Reheating:
- This pie is served cold, so there’s no need to reheat it. Simply keep it chilled until ready to serve.
Frequently Asked Questions
- Can I use sugar-free Jell-O?
- Yes! You can use sugar-free Jell-O if you’re looking for a lighter option. The pie will still set perfectly and taste great.
- Can I make this pie ahead of time?
- Absolutely! This pie can be made up to 2 days in advance. Just be sure to keep it covered and refrigerated until serving.
- Can I use a different crust?
- While a graham cracker crust is traditional, you can use any type of crust you like. Try a cookie crust or a gluten-free crust for a different twist.
- How can I add more flavor to the cream cheese filling?
- You can add a bit of lemon zest, lime juice, or even vanilla bean paste to the cream cheese filling to make it more flavorful.
Final Thoughts
This Easter Jell-O Pie is the perfect treat to bring some colorful fun to your holiday table. The vibrant layers of fruity Jell-O, combined with the creamy filling, create a delicious and refreshing dessert that’s sure to please everyone. It’s easy to make, visually stunning, and deliciously light, making it the perfect addition to your Easter celebration.
Give it a try and let me know how it turns out! Don’t forget to share your photos and thoughts in the comments below or on Pinterest. I can’t wait to hear how you enjoy this festive dessert!
Preparation Time: 15 minutes
Chilling Time: 4 hours
Cuisine: American
Nutritional Information (Per Serving):
Calories: 220 | Protein: 3g | Carbohydrates: 25g | Fat: 10g | Fiber: 0g | Sodium: 120mg
Print
Easter Jell-O Pie
- Total Time: 15 minutes
Description
Looking for a colorful and fun dessert that will wow your guests this Easter? This Easter Jell-O Pie is the perfect treat! With its vibrant layers of fruit-flavored Jell-O and creamy filling, this pie is not only delicious but also visually striking. It’s a fun way to celebrate the holiday and a perfect addition to your Easter dessert table. The best part? It’s incredibly easy to make and requires no baking—just a little patience while it sets in the fridge.
Want recipes like this delivered straight to your inbox? Subscribe now to get the latest culinary creations you’ll love.
Ingredients
For the Pie:
-
1 pre-made graham cracker crust (or make your own)
-
1 (3 oz) box of strawberry Jell-O
-
1 (3 oz) box of lime Jell-O
-
1 (3 oz) box of orange Jell-O
-
1 (3 oz) box of yellow Jell-O
-
1 cup boiling water (for each Jell-O flavor)
-
1 cup cold water (for each Jell-O flavor)
-
1 (8 oz) package cream cheese, softened
-
1 (8 oz) tub of whipped topping (like Cool Whip)
-
½ cup powdered sugar
-
1 tsp vanilla extract
Instructions
Step 1: Prepare the Jell-O Layers
-
Begin by preparing the Jell-O. In separate bowls, dissolve each box of Jell-O in 1 cup of boiling water. Stir until completely dissolved.
-
Once dissolved, add 1 cup of cold water to each bowl and mix well.
-
Let the Jell-O sit at room temperature for about 10 minutes to slightly cool.
Step 2: Layer the Jell-O
-
Pour the first flavor of Jell-O (e.g., strawberry) into the bottom of the graham cracker crust. Use a spoon to spread it evenly.
-
Place the pie in the fridge for about 30 minutes to set, or until the first layer is firm to the touch.
-
Once the first layer has set, carefully pour the next Jell-O flavor (e.g., lime) over the first layer. Be gentle to avoid disturbing the layer below.
-
Refrigerate the pie for another 30 minutes to set this layer.
-
Repeat this process with the remaining Jell-O flavors (orange and yellow), allowing each layer to set in the fridge before adding the next.
Step 3: Prepare the Cream Cheese Filling
-
While the Jell-O layers are setting, make the creamy filling. In a mixing bowl, beat the softened cream cheese with an electric mixer until smooth.
-
Add the powdered sugar and vanilla extract, and continue mixing until fully combined.
-
Gently fold in the whipped topping until the mixture is smooth and fluffy.
Step 4: Assemble the Pie
-
Once the final layer of Jell-O has set, spread the cream cheese filling over the top of the pie, smoothing it out to cover the entire surface.
-
Return the pie to the fridge and chill for at least 3 hours or until completely set.
Step 5: Serve
-
Before serving, garnish the pie with extra whipped topping or colorful sprinkles for an extra festive touch.
-
Slice the pie and enjoy the refreshing, fruity layers combined with the creamy filling!
Notes
Let Each Layer Set Properly – Be patient and allow each layer to set before adding the next one. This ensures clean, defined layers when you slice the pie.
Use Room Temperature Cream Cheese – To avoid lumps in the filling, make sure the cream cheese is softened to room temperature before mixing.
Experiment with Jell-O Flavors – You can change up the Jell-O flavors based on what you like or the colors you want for your pie. Blue, raspberry, and grape are great options for a different twist.
No-Bake Crust – If you’re short on time, you can buy a pre-made no-bake graham cracker crust, but if you want to go the extra mile, homemade graham cracker crust adds extra flavor and crunch.
- Prep Time: 15 minutes
- Cuisine: American