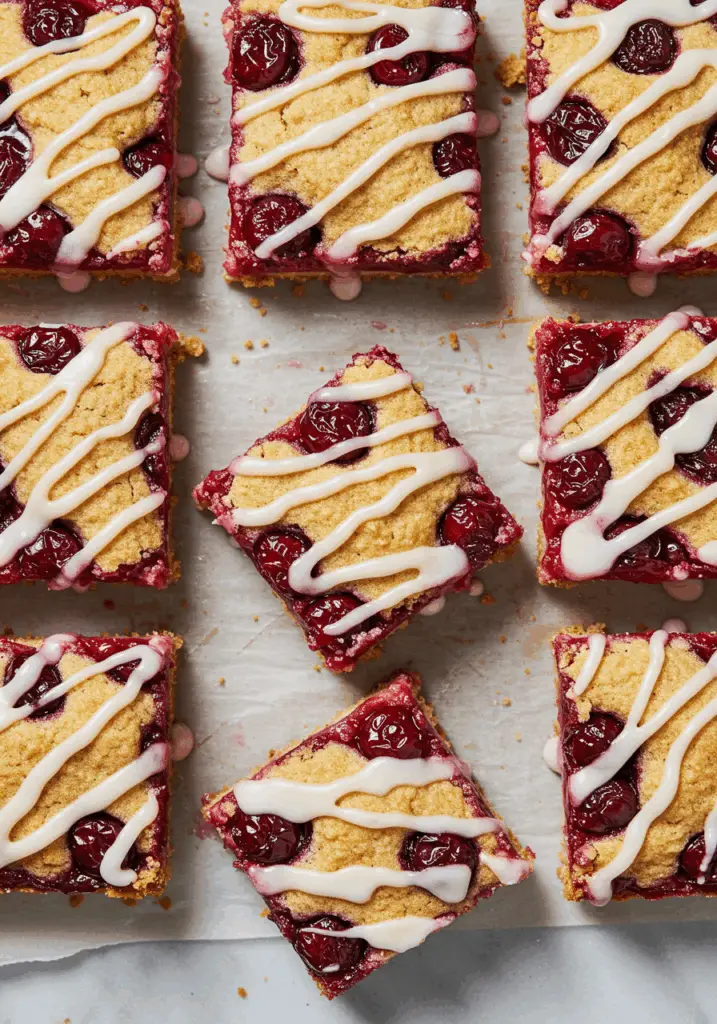
Sweet, buttery, and bursting with juicy cherries, Cherry Pie Bars are a delightful dessert that combines the nostalgic flavor of cherry pie with the ease of a bar cookie. With a soft, golden crust, fruity filling, and a vanilla glaze drizzle, these bars are perfect for potlucks, picnics, holidays, or just when you’re craving a sweet treat.
Want recipes like this delivered straight to your inbox? Subscribe now to get the latest easy desserts and baking favorites you’ll love.
Why You’ll Love This Recipe
Easy to Make – No rolling or pie crust fuss—just press and bake.
Classic Flavors – Tastes just like a homemade cherry pie in bar form.
Feeds a Crowd – Makes a big batch, perfect for sharing.
Customizable – Swap out cherries for other pie fillings like blueberry or apple.
Great Make-Ahead Dessert – Tastes even better the next day.
Ingredients You’ll Need
For the Dough:
- 1 cup unsalted butter, softened
- 1¾ cups granulated sugar
- 4 large eggs
- 1 tsp vanilla extract
- ½ tsp almond extract (optional but highly recommended)
- 3 cups all-purpose flour
- 1 tsp salt
For the Filling:
- 1 can (21 oz) cherry pie filling
For the Glaze:
- 1 cup powdered sugar
- 2–3 tbsp milk
- ½ tsp vanilla extract
Tools You’ll Need
- 9×13-inch baking dish
- Hand mixer or stand mixer
- Mixing bowls
- Rubber spatula or wooden spoon
- Measuring cups and spoons
- Cooling rack
Step-by-Step Instructions
Step 1: Preheat and Prepare
Preheat your oven to 350°F (175°C). Grease a 9×13-inch baking dish or line it with parchment paper for easy removal.
Step 2: Make the Dough Base
In a large mixing bowl, cream the softened butter and sugar until light and fluffy (about 2–3 minutes).
Beat in the eggs one at a time, then mix in vanilla and almond extract.
Gradually add in the flour and salt, mixing just until combined. The dough will be thick and sticky.
Step 3: Layer the Base
Spread about ⅔ of the dough evenly into the prepared baking dish. Use a spatula or lightly floured fingers to press it into a smooth layer.
Step 4: Add the Cherry Filling
Spoon the cherry pie filling evenly over the dough layer, spreading gently to cover the surface.
Step 5: Add the Top Layer
Drop spoonfuls of the remaining dough over the cherry filling. It won’t cover the entire surface—and that’s okay. The cherry will peek through after baking.
Step 6: Bake to Golden Perfection
Bake for 35–40 minutes, or until the top is lightly golden and a toothpick inserted into the dough (not the cherry part) comes out clean.
Remove from oven and allow to cool completely in the pan.
Step 7: Drizzle with Glaze
In a small bowl, whisk together powdered sugar, milk, and vanilla until smooth. Drizzle over the cooled bars with a spoon or fork. Let the glaze set before cutting into squares.
Tips for the Best Cherry Pie Bars
Use Room Temp Ingredients – Makes mixing smoother and more consistent.
Don’t Overmix – Once flour is added, mix just until combined for a soft texture.
Almond Extract Boosts Flavor – A little goes a long way and pairs beautifully with cherries.
Cool Before Glazing – Ensure the bars are fully cool or the glaze will melt into the top.
Line the Pan – Use parchment paper for easy removal and clean slicing.
Serving Suggestions
Serve Chilled or at Room Temp – Both ways are delicious.
Top with Ice Cream – A scoop of vanilla turns these into an extra-indulgent treat.
Add Whipped Cream – Light and fluffy topping for a pie-inspired finish.
Sprinkle with Toasted Almonds – Adds a little crunch and nutty contrast.
How to Store & Freeze
Storing:
- Room Temperature: Store in an airtight container for up to 2 days.
- Refrigerate: Keeps well chilled for up to 5 days.
Freezing:
- Let bars cool and glaze set fully before wrapping in layers of plastic wrap and foil.
- Freeze for up to 2 months. Thaw overnight in the fridge before serving.
Reheating (Optional):
- If you prefer them warm, microwave individual slices for 10–15 seconds.
Frequently Asked Questions
1. Can I use homemade cherry pie filling?
Absolutely! Homemade cherry filling gives it an extra special touch and allows you to control sweetness.
2. What other pie fillings work well?
Try blueberry, raspberry, peach, or apple pie filling. You can even do a mix!
3. Can I make this gluten-free?
Yes, substitute with a 1:1 gluten-free flour blend. The texture may vary slightly but should still be delicious.
4. Can I skip the glaze?
Sure! The glaze adds sweetness and a nice finish, but the bars are tasty even without it.
5. Can I bake this in a different pan size?
Yes, but adjust baking time accordingly. For thicker bars in a smaller pan, increase the time by 5–10 minutes.
Final Thoughts
Cherry Pie Bars are everything you love about cherry pie—but way easier to make and serve. With their buttery crust, sweet cherry filling, and pretty glaze drizzle, they’re perfect for holidays, potlucks, or just an afternoon treat.
Bake a batch and watch them disappear—fast! Don’t forget to comment below and share your twist on this classic favorite.
Preparation Time: 15 minutes
Cooking Time: 40 minutes
Cuisine: American
Nutritional Information (Per Serving):
Calories: 290 | Protein: 3g | Carbohydrates: 42g | Fat: 13g | Fiber: 1g | Sodium: 120mg
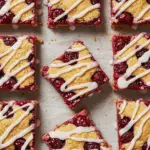
Cherry Pie Bars
- Total Time: 55 minutes
Description
Sweet, buttery, and bursting with juicy cherries, Cherry Pie Bars are a delightful dessert that combines the nostalgic flavor of cherry pie with the ease of a bar cookie. With a soft, golden crust, fruity filling, and a vanilla glaze drizzle, these bars are perfect for potlucks, picnics, holidays, or just when you’re craving a sweet treat.
Want recipes like this delivered straight to your inbox? Subscribe now to get the latest easy desserts and baking favorites you’ll love.
Ingredients
For the Dough:
-
1 cup unsalted butter, softened
-
1¾ cups granulated sugar
-
4 large eggs
-
1 tsp vanilla extract
-
½ tsp almond extract (optional but highly recommended)
-
3 cups all-purpose flour
-
1 tsp salt
For the Filling:
-
1 can (21 oz) cherry pie filling
For the Glaze:
-
1 cup powdered sugar
-
2–3 tbsp milk
-
½ tsp vanilla extract
Instructions
Step 1: Preheat and Prepare
Preheat your oven to 350°F (175°C). Grease a 9×13-inch baking dish or line it with parchment paper for easy removal.
Step 2: Make the Dough Base
In a large mixing bowl, cream the softened butter and sugar until light and fluffy (about 2–3 minutes).
Beat in the eggs one at a time, then mix in vanilla and almond extract.
Gradually add in the flour and salt, mixing just until combined. The dough will be thick and sticky.
Step 3: Layer the Base
Spread about ⅔ of the dough evenly into the prepared baking dish. Use a spatula or lightly floured fingers to press it into a smooth layer.
Step 4: Add the Cherry Filling
Spoon the cherry pie filling evenly over the dough layer, spreading gently to cover the surface.
Step 5: Add the Top Layer
Drop spoonfuls of the remaining dough over the cherry filling. It won’t cover the entire surface—and that’s okay. The cherry will peek through after baking.
Step 6: Bake to Golden Perfection
Bake for 35–40 minutes, or until the top is lightly golden and a toothpick inserted into the dough (not the cherry part) comes out clean.
Remove from oven and allow to cool completely in the pan.
Step 7: Drizzle with Glaze
In a small bowl, whisk together powdered sugar, milk, and vanilla until smooth. Drizzle over the cooled bars with a spoon or fork. Let the glaze set before cutting into squares.
Notes
Use Room Temp Ingredients – Makes mixing smoother and more consistent.
Don’t Overmix – Once flour is added, mix just until combined for a soft texture.
Almond Extract Boosts Flavor – A little goes a long way and pairs beautifully with cherries.
Cool Before Glazing – Ensure the bars are fully cool or the glaze will melt into the top.
Line the Pan – Use parchment paper for easy removal and clean slicing.
- Prep Time: 15 minutes
- Cook Time: 40 minutes
- Cuisine: American