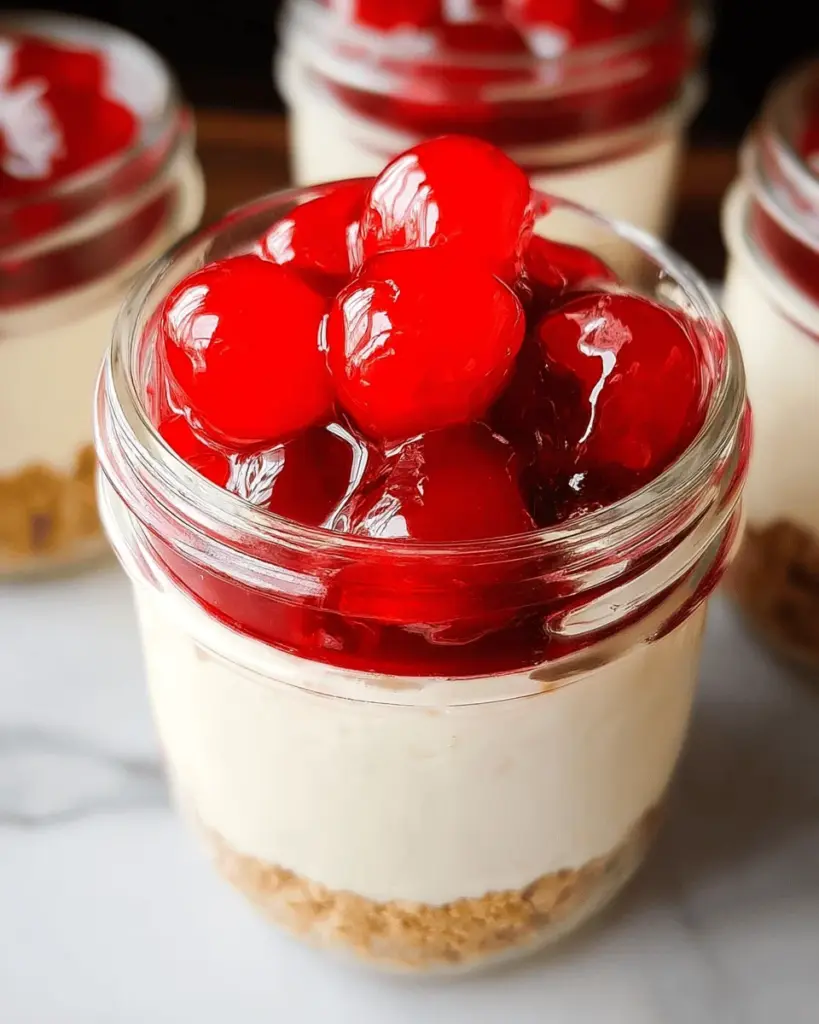
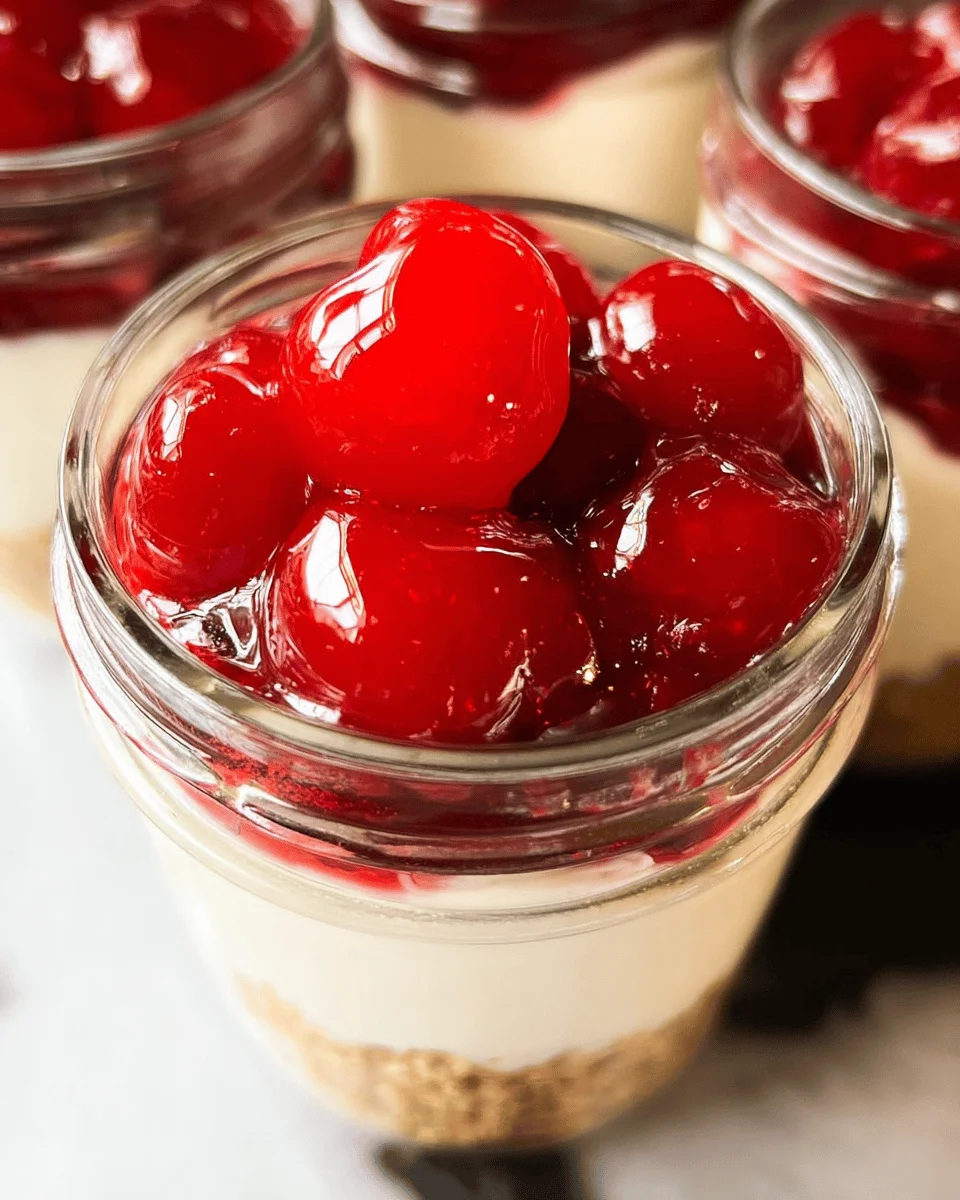
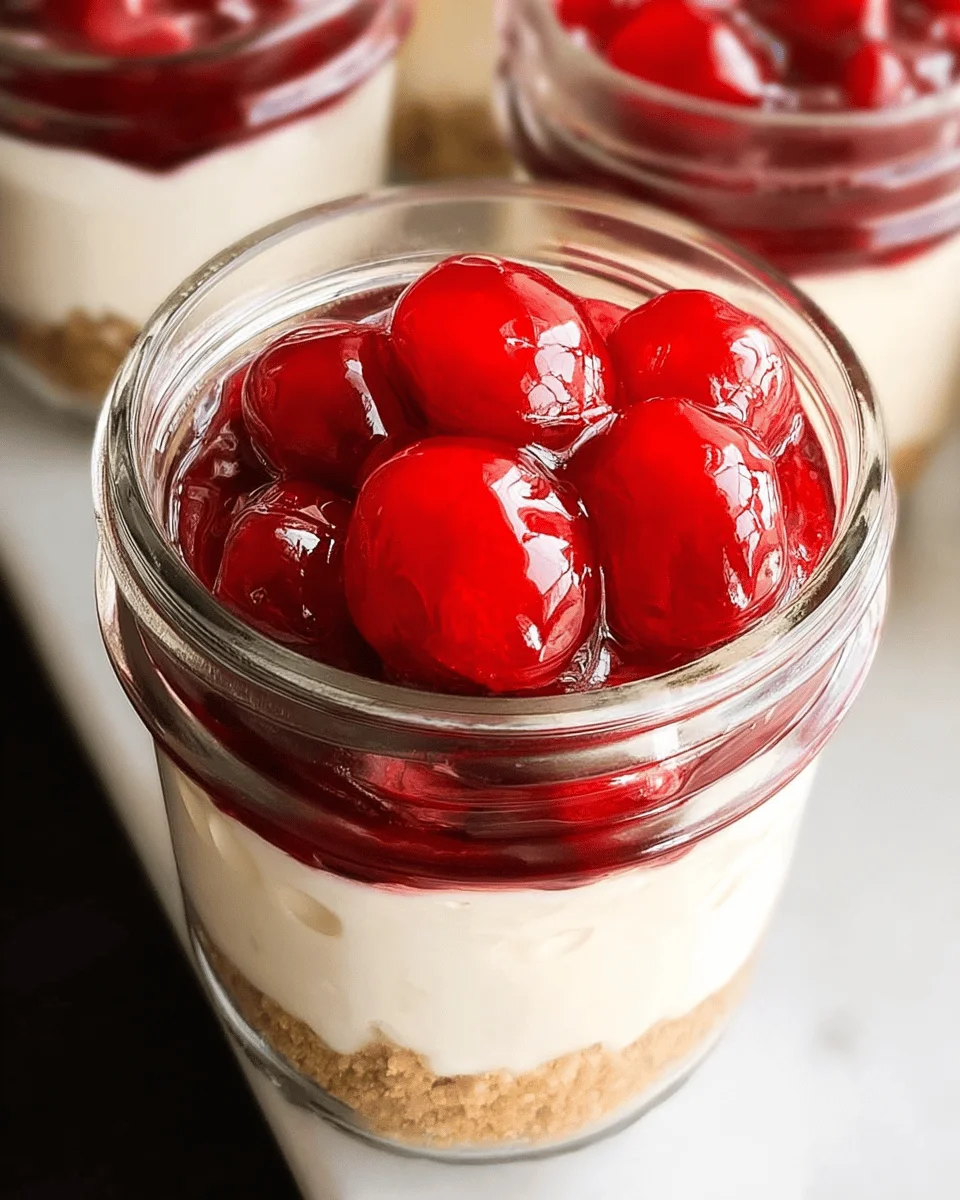
Cheesecake in a jar is the perfect dessert for any gathering. This delightful treat combines creamy cheese filling, a crunchy crust, and sweet cherry topping in individual jars. Not only does it look stunning, but it also offers convenience—making it ideal for parties, picnics, or simply enjoying at home. Each bite is a delightful balance of flavors and textures that will leave everyone wanting more.
Why You’ll Love This Recipe
- Easy Preparation: With minimal steps and quick prep time, you can whip up these tasty jars in just 25 minutes.
- Stunning Presentation: Serving cheesecake in jars creates an eye-catching display that impresses guests at any event.
- Customizable Toppings: While cherry pie filling is a classic choice, feel free to experiment with your favorite fruits or sauces for a personal touch.
- Perfect Portions: Individual jars make it easy to control serving sizes, so everyone gets just the right amount of dessert.
- No Baking Required: Enjoy a delicious cheesecake without the hassle of oven time or complex baking techniques.
Tools and Preparation
To make this delightful cheesecake in a jar, having the right tools will streamline your preparation process.
Essential Kitchen Tools
- Mixing bowls
- Mixer (hand or stand)
- Piping bag
- Measuring cups
- Jars (six)
Why These Tools Matter
- Mixer: A mixer helps achieve the perfect creamy texture for your cheese filling by easily blending ingredients together.
- Piping Bag: Using a piping bag allows you to fill the jars neatly, ensuring an even distribution of filling without any mess.
- Mixing Bowls: Having separate mixing bowls for different ingredients helps keep your workspace organized and makes the process smoother.
Ingredients
Ingredients:
– 1¼ cups graham cracker crumbs
– ¼ cup butter (melted)
– ¼ cup granulated sugar
– 8 ounces cream cheese (softened)
– ½ cup confectioners’ sugar
– 1 teaspoon vanilla extract
– 1 cup heavy cream
– 21 ounces cherry pie filling

How to Make Cheesecake in a Jar
Step 1: Prepare the Crust
Combine the graham cracker crumbs, melted butter, and granulated sugar in a medium mixing bowl.
* Mix until well combined.
* Divide this crumb mixture evenly into the bottom of six jars.
* Gently press down to create an even layer.
Step 2: Make the Cream Cheese Filling
In another bowl, beat the softened cream cheese with confectioners’ sugar and vanilla extract using your mixer on medium-high speed.
* Continue until the mixture is soft and creamy.
Step 3: Whip the Heavy Cream
In a large mixing bowl, whip the heavy cream with your mixer on high speed until you achieve soft peaks.
Step 4: Combine Mixtures
Fold the whipped cream into the cream cheese mixture gently until fully combined.
Step 5: Fill the Jars
Place this creamy filling into a piping bag. Pipe the mixture into each jar over the crust layer.
Step 6: Add Toppings
Top each jar with a few tablespoons of cherry pie filling for sweetness and color.
Now you have beautiful cheesecakes ready to enjoy!
How to Serve Cheesecake in a Jar
Cheesecake in a jar is versatile and fun to serve. You can customize your presentation to suit any occasion, making it an ideal dessert for gatherings or casual get-togethers. Here are some creative serving suggestions.
Individual Dessert Cups
- Serve each jar as a personal dessert. This makes it easy for guests to enjoy their cheesecake without needing to share.
Layered with Fresh Fruits
- Add layers of fresh berries or sliced fruits like strawberries and blueberries between the cheesecake filling for added freshness and color.
Drizzled with Chocolate Sauce
- Top with a rich chocolate sauce or melted chocolate for those chocolate lovers in your life. It adds an extra layer of indulgence.
With Whipped Cream Topping
- Garnish each jar with a dollop of whipped cream on top. This not only looks appealing but also enhances the creamy texture.
Accompanied by Cookies
- Serve alongside some homemade cookies or biscotti. The crunchy texture pairs wonderfully with the creamy cheesecake.
As Party Favors
- Present jars as party favors at birthdays or weddings. Personalizing the jars adds a special touch that guests will appreciate.
How to Perfect Cheesecake in a Jar
To achieve the ideal consistency and flavor in your cheesecake in a jar, consider these helpful tips.
- Use Softened Cream Cheese: Ensure your cream cheese is at room temperature before mixing. This will create a smoother, creamier filling.
- Whip the Cream Properly: Beat the heavy cream until it forms soft peaks, which helps to add lightness and volume to the cheesecake mixture.
- Chill Before Serving: Allow the jars to chill in the refrigerator for at least two hours before serving. This helps set the layers and enhances the flavors.
- Mix Gently: When folding whipped cream into the cream cheese mixture, do so gently. This preserves the airiness that gives your cheesecake its light texture.
- Experiment with Flavors: Feel free to change up the flavors by adding lemon zest or cocoa powder into the cream cheese mixture for different variations.
- Seal Tightly: If preparing ahead of time, ensure each jar is sealed tightly to keep them fresh and delicious until you’re ready to serve.
Best Side Dishes for Cheesecake in a Jar
Pairing side dishes with cheesecake in a jar can enhance your dessert experience. Here are some delightful options that complement this creamy treat perfectly.
- Fruit Salad: A refreshing mix of seasonal fruits provides a light contrast to the rich cheesecake.
- Chocolate-Dipped Strawberries: These decadent treats add elegance and sweetness, making them perfect companions.
- Mini Muffins: Offering an assortment of mini muffins (like blueberry or banana) provides variety and texture alongside your cheesecake.
- Nutty Granola Bars: Crunchy granola bars add a satisfying crunch and can be enjoyed alongside or crumbled on top of your cheesecake.
- Vanilla Ice Cream: A scoop of vanilla ice cream served on the side can elevate your dessert experience with its creamy goodness.
- Caramel Popcorn: Sweet caramel popcorn adds a fun crunch that contrasts beautifully with the smoothness of cheesecake in a jar.
Common Mistakes to Avoid
When making cheesecake in a jar, it’s easy to overlook some key steps. Here are common mistakes to watch out for:
- Skipping the Softening Step: Always ensure your cream cheese is softened. Cold cream cheese will create lumps in your filling.
- Overmixing the Cream Cheese: Be careful not to overbeat the cream cheese mixture. This can lead to a runny texture instead of a creamy one.
- Not Pressing the Crust Firmly: When adding the crust, press it down firmly to create a solid base. A loose crust may crumble when you try to scoop it out.
- Using Warm Ingredients: Make sure your heavy cream is cold when whipping it. Warm cream won’t whip properly, leading to a flat filling.
- Ignoring Layering Techniques: Layer the cheesecake filling and toppings thoughtfully. This ensures each bite has a balanced flavor and texture.
Storage and Reheating
Refrigerator Storage
- item Store your jars in an airtight container.
- item Cheesecake in a jar can last up to 5 days in the refrigerator.
- item Keep them at the back of the fridge for optimal freshness.
Freezing Cheesecake in a Jar
- item You can freeze cheesecake jars for up to 2 months.
- item Use freezer-safe containers or wrap jars tightly with plastic wrap.
- item Thaw them overnight in the refrigerator before serving.
Reheating Cheesecake in a Jar
- Oven: Preheat your oven to 350°F (175°C). Place jars on a baking sheet and warm for about 10 minutes.
- Microwave: Heat on medium power for 15-20 seconds. Check frequently to avoid overheating.
- Stovetop: Place jars in a pot with simmering water. Cover and warm gently for about 5 minutes.
Frequently Asked Questions
Here are some common questions about making cheesecake in a jar:
How can I customize my Cheesecake in a Jar?
You can easily customize your cheesecake by using different toppings like blueberries, strawberries, or chocolate sauce. You can also mix flavorings into the cream cheese layer, such as lemon zest or almond extract.
What other fillings can I use besides cherry pie filling?
You can use various fillings such as raspberry jam, chocolate ganache, or even fresh fruit like sliced peaches or bananas for added flavor.
Can I make Cheesecake in a Jar ahead of time?
Yes! Cheesecake in a jar is perfect for making ahead of time. Just store them in the fridge until you’re ready to serve.
Is it possible to make this dessert gluten-free?
Absolutely! Simply use gluten-free graham cracker crumbs or crushed nuts for the crust, and ensure all other ingredients are gluten-free.
Conclusion
Cheesecake in a jar is not only delicious but also incredibly versatile. With its creamy layers and customizable toppings, it’s perfect for any occasion. Whether you’re hosting friends or enjoying a sweet treat at home, this recipe is sure to impress. Try experimenting with different flavors and toppings to make it uniquely yours!

Cheesecake in a Jar
- Total Time: 0 hours
- Yield: Serves 6 jars 1x
Description
Indulge in the creamy delight of Cheesecake in a Jar, a perfect dessert for any gathering. This no-bake treat combines a crunchy graham cracker crust with a smooth, rich cheese filling, topped with luscious cherry pie filling. Not only does it offer a stunning visual appeal, but its individual servings also add convenience for parties or casual get-togethers. With just 25 minutes of preparation, you can impress your guests with this delightful dessert that balances flavors and textures in every bite. Plus, it’s fully customizable, allowing you to incorporate your favorite fruits or sauces for a personal touch.
Ingredients
- 1¼ cups graham cracker crumbs
- ¼ cup melted butter
- ¼ cup granulated sugar
- 8 ounces softened cream cheese
- ½ cup confectioners’ sugar
- 1 teaspoon vanilla extract
- 1 cup heavy cream
- 21 ounces cherry pie filling
Instructions
- In a mixing bowl, combine graham cracker crumbs, melted butter, and granulated sugar until well blended. Divide evenly into six jars and press down to form the crust.
- In another bowl, beat softened cream cheese with confectioners’ sugar and vanilla extract until creamy.
- Whip heavy cream until soft peaks form.
- Gently fold whipped cream into the cream cheese mixture until fully combined.
- Pipe the cream mixture into each jar over the crust layer.
- Top each jar with cherry pie filling.
- Prep Time: 25 minutes
- Cook Time: None
- Category: Dessert
- Method: No-Bake
- Cuisine: American
Nutrition
- Serving Size: 1 jar (150g)
- Calories: 360
- Sugar: 24g
- Sodium: 180mg
- Fat: 24g
- Saturated Fat: 14g
- Unsaturated Fat: 10g
- Trans Fat: 0g
- Carbohydrates: 30g
- Fiber: 1g
- Protein: 4g
- Cholesterol: 70mg