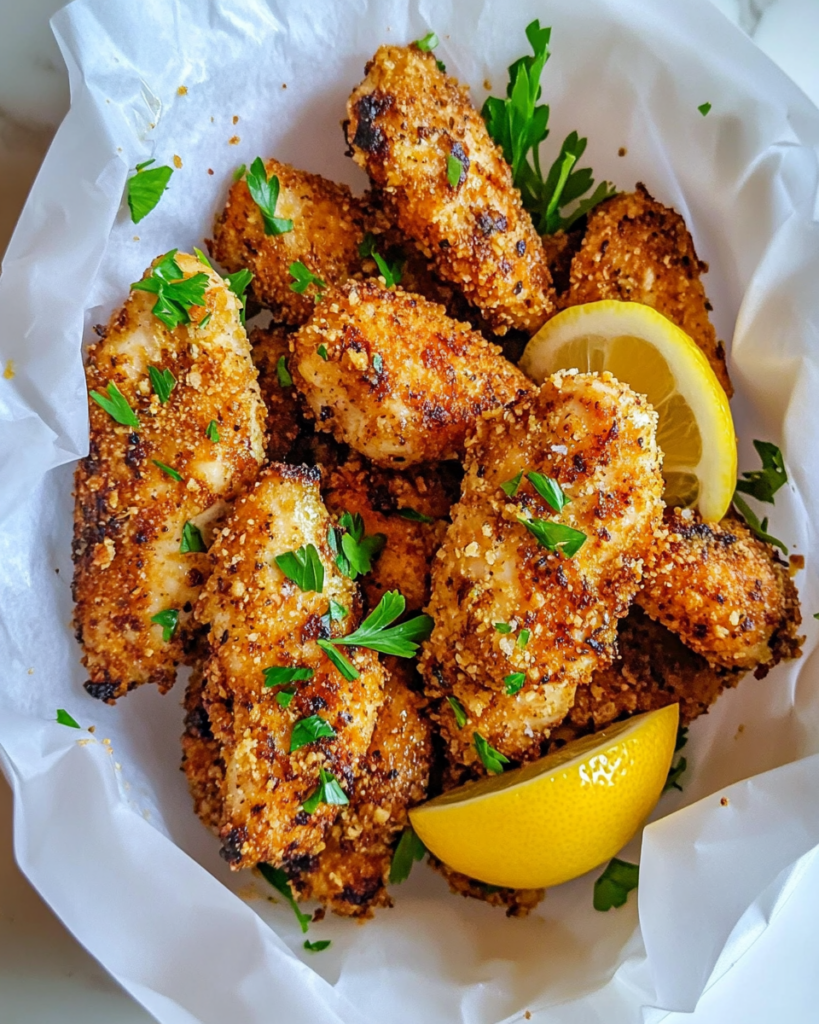
Crispy, juicy, and packed with flavor, these Lemon Garlic Parmesan Chicken Tenders are a game-changer! They’re coated in a delicious mix of parmesan cheese, garlic, and zesty lemon, then baked or air-fried to golden perfection. Whether you serve them as an appetizer, snack, or main dish, they’re guaranteed to be a hit with the whole family!
Subscribe to our newsletter for more easy and tasty recipes!
Why You’ll Love These Lemon Garlic Parmesan Chicken Tenders
✔ Crispy & Juicy – A perfect crunch on the outside with tender, juicy chicken inside.
✔ No Deep Frying Needed – Baked or air-fried for a healthier option.
✔ Packed with Flavor – The perfect blend of lemon, garlic, and parmesan cheese.
✔ Family-Friendly – Loved by both kids and adults!
Ingredients for Lemon Garlic Parmesan Chicken Tenders
- 1 lb chicken tenders (or boneless, skinless chicken breasts cut into strips)
- 1 cup panko breadcrumbs (for extra crispiness)
- ½ cup grated parmesan cheese
- 1 teaspoon garlic powder
- ½ teaspoon onion powder
- ½ teaspoon paprika
- ½ teaspoon salt
- ¼ teaspoon black pepper
- Zest of 1 lemon
- 2 tablespoons lemon juice
- 1 tablespoon fresh parsley, chopped (optional)
- 2 eggs (for coating)
- 1 tablespoon milk
- ½ cup all-purpose flour
- 2 tablespoons olive oil or melted butter (for brushing or spraying)
Tools You’ll Need
- Baking sheet with parchment paper (for baking)
- Air fryer (if air-frying)
- Mixing bowls
- Tongs
How to Make Lemon Garlic Parmesan Chicken Tenders
Step 1: Preheat and Prepare
- For baking: Preheat your oven to 400°F (200°C) and line a baking sheet with parchment paper.
- For air frying: Preheat your air fryer to 375°F (190°C).
Step 2: Set Up the Breading Station
- In one bowl, whisk together eggs and milk.
- In a second bowl, mix flour, salt, black pepper, and paprika.
- In a third bowl, combine panko breadcrumbs, parmesan cheese, garlic powder, onion powder, and lemon zest.
Step 3: Coat the Chicken
- Dredge each chicken tender in the flour mixture, shaking off excess.
- Dip into the egg mixture, making sure it’s fully coated.
- Press into the breadcrumb mixture, ensuring an even coat.
Step 4: Cook the Chicken
- For baking:
- Place chicken tenders on the prepared baking sheet.
- Lightly brush or spray with olive oil or melted butter.
- Bake for 18-20 minutes, flipping halfway, until golden and crispy.
- For air frying:
- Arrange chicken in a single layer in the air fryer basket.
- Lightly spray with olive oil.
- Air fry for 10-12 minutes, flipping halfway, until crispy and cooked through.
Step 5: Add the Lemon Garlic Finishing Touch
- Toss the cooked tenders with lemon juice and fresh parsley.
- Sprinkle with extra parmesan cheese, if desired.
Step 6: Serve & Enjoy!
- Serve hot with your favorite dipping sauces like ranch, honey mustard, or marinara.
- Pair with fries, coleslaw, or a fresh salad for a complete meal.
Serving Suggestions
- These tenders pair perfectly with garlic aioli, ranch, or a honey lemon dipping sauce.
- Serve with a side of roasted veggies, mashed potatoes, or a fresh salad.
- Make it a meal by adding them to a sandwich, wrap, or pasta dish!
Tips for the Best Lemon Garlic Parmesan Chicken Tenders
Use Panko Breadcrumbs – They give the crispiest coating!
Don’t Skip the Lemon Zest – It adds a bright, fresh flavor.
Air Fry for Extra Crispiness – The air fryer makes them extra crunchy without extra oil.
Let Them Rest for a Minute – This helps keep them crispy before serving.
Storage Instructions
- Refrigerate: Store leftovers in an airtight container for up to 3 days.
- Reheat: Warm in the oven at 350°F (175°C) for 5-7 minutes or in the air fryer for 3-4 minutes.
- Freeze: Freeze uncooked breaded tenders on a baking sheet, then transfer to a freezer bag for up to 3 months.
Frequently Asked Questions (FAQ)
Q1: Can I make these gluten-free?
A: Yes! Use gluten-free breadcrumbs and swap the flour for almond or gluten-free flour.
Q2: Can I use chicken breasts instead?
A: Absolutely! Just cut the chicken breasts into strips before breading.
Q3: What’s the best way to make them extra crispy?
A: Use panko breadcrumbs, an air fryer, and make sure not to overcrowd the pan!
Conclusion: A Crispy, Flavor-Packed Favorite!
These Lemon Garlic Parmesan Chicken Tenders are crispy, juicy, and bursting with bold flavors. Whether you bake or air-fry them, they’re perfect for a quick meal, appetizer, or even meal prep. Give them a try, and you’ll never want plain chicken tenders again!
Did you make this recipe? Leave a review and tag us on Instagram with your delicious creations!
Preparation Time: 10 minutes
Cooking Time: 20 minutes
Cuisine: American
Nutritional Information (Per Serving)
Calories: 340 | Protein: 32g | Carbohydrates: 18g | Fat: 16g | Fiber: 2g | Sodium: 540mg
Enjoy these crispy, lemony, and cheesy chicken tenders with your favorite sides!
Print
Lemon Garlic Parmesan Chicken Tenders
- Total Time: 30 minutes
Description
Crispy, juicy, and packed with flavor, these Lemon Garlic Parmesan Chicken Tenders are a game-changer! They’re coated in a delicious mix of parmesan cheese, garlic, and zesty lemon, then baked or air-fried to golden perfection. Whether you serve them as an appetizer, snack, or main dish, they’re guaranteed to be a hit with the whole family!
Subscribe to our newsletter for more easy and tasty recipes!
Ingredients
- 1 lb chicken tenders (or boneless, skinless chicken breasts cut into strips)
- 1 cup panko breadcrumbs (for extra crispiness)
- ½ cup grated parmesan cheese
- 1 teaspoon garlic powder
- ½ teaspoon onion powder
- ½ teaspoon paprika
- ½ teaspoon salt
- ¼ teaspoon black pepper
- Zest of 1 lemon
- 2 tablespoons lemon juice
- 1 tablespoon fresh parsley, chopped (optional)
- 2 eggs (for coating)
- 1 tablespoon milk
- ½ cup all-purpose flour
- 2 tablespoons olive oil or melted butter (for brushing or spraying)
Instructions
Step 1: Preheat and Prepare
- For baking: Preheat your oven to 400°F (200°C) and line a baking sheet with parchment paper.
- For air frying: Preheat your air fryer to 375°F (190°C).
Step 2: Set Up the Breading Station
- In one bowl, whisk together eggs and milk.
- In a second bowl, mix flour, salt, black pepper, and paprika.
- In a third bowl, combine panko breadcrumbs, parmesan cheese, garlic powder, onion powder, and lemon zest.
Step 3: Coat the Chicken
- Dredge each chicken tender in the flour mixture, shaking off excess.
- Dip into the egg mixture, making sure it’s fully coated.
- Press into the breadcrumb mixture, ensuring an even coat.
Step 4: Cook the Chicken
-
For baking:
- Place chicken tenders on the prepared baking sheet.
- Lightly brush or spray with olive oil or melted butter.
- Bake for 18-20 minutes, flipping halfway, until golden and crispy.
-
For air frying:
- Arrange chicken in a single layer in the air fryer basket.
- Lightly spray with olive oil.
- Air fry for 10-12 minutes, flipping halfway, until crispy and cooked through.
Step 5: Add the Lemon Garlic Finishing Touch
- Toss the cooked tenders with lemon juice and fresh parsley.
- Sprinkle with extra parmesan cheese, if desired.
Step 6: Serve & Enjoy!
- Serve hot with your favorite dipping sauces like ranch, honey mustard, or marinara.
- Pair with fries, coleslaw, or a fresh salad for a complete meal.
Notes
Use Panko Breadcrumbs – They give the crispiest coating!
Don’t Skip the Lemon Zest – It adds a bright, fresh flavor.
Air Fry for Extra Crispiness – The air fryer makes them extra crunchy without extra oil.
Let Them Rest for a Minute – This helps keep them crispy before serving.
- Prep Time: 10 minutes
- Cook Time: 20 minutes
- Cuisine: American